Check out new blog posts here at my new website and blog space. I have been doing some natural dyeing on silk and now I am stitching on raw silk for a collaboration with some gals from the St. Louis area. More adventures in textiles to come!
The answer to that is “no.” But I think all of our phases of life work together and add up to perhaps a final, completed manifestation of where you were always supposed to go in life.
I have been absent-minded….from art that is…because I am on another “assignment,” I haven’t been giving much mind to making art….but I still love it. I enjoy the “eye candy” of others that I find on Facebook, but am not driven like I used to be to go “make something right now!” But I am a “creator, ” there is no doubt about that. I love creating, whether it’s painting, paper collage or dyeing and printing fiber, or illustrations for books and writing. I love it all. I love creating on a print table, or taking lessons to learn something new on the computer and then creating digital images and patterns in Photoshop and Illustrator products.
At this point in time, I am packing to make a move to a different place for my studio and office. All of you other creators out there know what that means, right? That means that while I pack, I am going to sort through and maybe even “get rid” of some things. But getting rid doesn’t mean throwing away, no. “Getting rid of” means thinking of people who might want my stuff! I was not trained in childhood to throw anything away! I have already given four bags of blue jeans to a woman in my area who makes rag rugs! And Facebook is a great marketplace to get rid of stuff. I have a contact to sell my stash of commercial fabrics to…I just have to get to the place where I have gone through it all and then contact her.
So today, I am at the studio working…and I am finding myself going.through.every.little.thing. I love looking through my stuff I haven’t seen for awhile! How about you? All the memories of the fun you had making it! Yeh. Wow. I’m immersed in it. It’s just hard to believe how I want to hang on to every.little.thing.I.ever.made. Why would I ever get rid of that little photo book I had printed? It contains photos of almost every silk scarf I ever printed. It’s a record of my creating…I will never print another book as this was a trial catalog to document my previous work. Many of those scarves I no longer have as they were sold or given or traded away. The book is the memory of all the fun I had and the patterns I made.
I save every.scrap.of.paper too. Patterns and colors always draw me away….
There’s other stuff here in my shop that isn’t art stuff. I am preparing a giveaway pile that I will set out on the sidewalk that people can just take, but so far it’s not a very big pile. I don’t know how this ends up…I just know I have to move and I’m trying to do it in some organized fashion (so I have some idea where stuff is). Most of the dyeing and printing stuff will remain packed up after the move while I decide what to do with that. I am not planning to have more classes and workshops.
But packing could take a while at the pace I’m going….I might daydream a lot…
This is a sweet and fun project to do with kids! You use bleeding tissue paper to make the colorful background collage. Then the children draw a self portrait on top of the colors.
Hello new readers! I have been teaching Mixed Media classes and trying my hand at natural dyeing. You simply must go on over to katherinesands.com/blog to see what has been going on this summer. Thanks for following and reading!
Hello. I just wanted all the readers here at this space to know that I have a brand new website just went live recently! It is at http://www.katherinesands.com.
I haven’t posted for quite a while. My father-in-law reminded me this past weekend at our family reunion. He said he checks in from time to time to see what I’m up to! Well, I work a lot now and get very little done creatively.
A couple of weeks ago I stopped at a yard sale and purchased 14 old t-shirts for cheap because I want to make this. It just looks like fun.
Isn’t it the cutest? Can’t wait to wear one, but it’s too hot here right now.
I entered this is in a show and it was rejected. 😦
Still a Collage
TriState Artisans will have a new name this year and a new brochure for our studio tour in December. We are losing a few artisans on the Illinois side and adding a couple of new ones. You won’t want to miss it! Here is a photo of my work that will be featured in the new brochure.
More news: I am working on moving into a REAL studio space! A 20 x 80 foot building has come open across the street from where I work. The biggest portion of it will be my workspace and classroom for teaching. I am planning to put a small shop in the front part. Although I can’t be open every day, the shop will have my art for sale as well as consigned items by other artists/artisans. I am looking forward to getting in and getting some work done!
Another piece of good news…I was going to order another Square swiper yesterday because the one they sent me didn’t seem to work in my Android tablet. On a lark, I thought I would stick the one I had back in and check it. Lo, and behold, it worked! I could actually SWIPE the card, so I made two $1 payments to myself. Besides, I need to practice so I know how to use the darn thing. I guess the fees I paid were worth it! I think I’m going to love this little tool.
I received a fascinating new book in the mail! Martha Sielman has hit it out of the ball park again with this next book in the Portfolio series. Many of the artists I am familiar with and many I became acquainted with in this volume. Twenty-one specific artists are given feature status, endowing the viewer with a perspective of their work in six-page spreads. Other artists’ works are sprinkled throughout, amply adding to this comprehensive look at current work featuring people and portraits in the textile art world . Each of the featured artists’ work is accompanied by a rich narrative of what makes them who they are and how they arrive at their finished works.
Enjoy Bodil Gardener’s work with her playful, exaggerated characters. So much fun!
Collette Berends uses a very painterly effect in her work.
I adore the quirkiness and simplified forms of Yoshiko Kurihara. I especially like Morning Breeze.
Morning Breeze
Mary Pal’s amazing works using simple cheesecloth on black backgrounds portrays details not thought possible by this writer!
Viola Burley Leak uses highly expressive images. Her works are colorful with lots of movement. The use of black gives weight to her use of brilliant colors.
The cartoons of Pam RuBert entertain, as always. She is probably the most humorous textile artist I know.
St. Louis…Wish You Were Hair
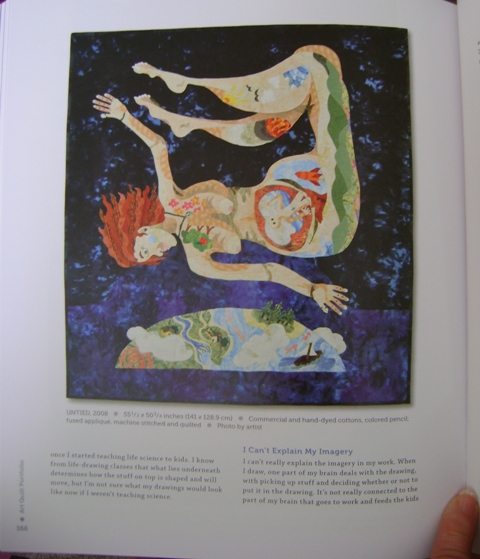
Kathy Nida is provocative, daring the viewer to be offended by her raw depictions of women in various social situations.
United
Jenny Bowkers, depicting her middle east travels has work included in this volume. Olga Norris with her faceless figures, and Lora Rocke, Joan Sowada, and Maria Elkins, all with the most breathtaking realism, are in the Portfolio. The painted work of Inge Mardal and Steen Hougs is here.
Sielman has gifted us with another stunning compilation of art in textiles. Purchase here.
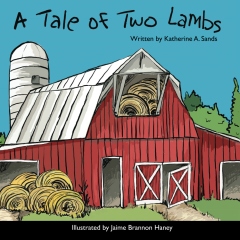
I am finally posting on my long-neglected blog. Life has been wayyyy too busy! I am busy working at the paper, the holidays came and went during which time I was taking an InDesign class so I could learn to do layout for work, and at the same time, I was working with my illustrator, Jaime Brannon Haney, putting this book together.
It is our first children’s book, A Tale of Two Lambs. The book was timed to come out before Easter as it is created around the Easter story. You can order copies at https://www.createspace.com/4144683 or pay through Paypal to my email address at kathy@katherinesands.com and I will ship it out! The book is $10.95 plus $3.00 tax and shipping when you order from me.
These photos sum up what I have been up to today….
California White Chocolate Fudge with dried apricots and walnuts
Snack Mix Squares
Molasses-Spice Crinkles – that is sparkling sugar on these cookies
Peanut butter sandwiches on Ritz crackers dipped in chocolate
Almond Strips – OMG these are the best…almond flavored shortbread drizzled with almonds and vanilla flavored icing
Now that the shows are done, I can finish preparing for the holidays. All I have left to do, as far as candy and cookies are concerned, is peanut butter balls and dipped pretzels. Yea!